Community Workbench & Shaving Horse

I moved my shop into a shared maker-space 14 months ago. This turned out to be a transformative experience for me. Being around other woodworkers and makers of various sorts has been incredibly inspiring. One of the things I was recently inspired to do was construct some gear for the community of makers in our shop.

In our shop I am the only woodworker with much hand-tool experience. My bench was moved to the new space, though was not really available for others to use. If you have ever tried woodworking without a good bench, you know how miserable this experience is, particularly if you are attempting to use any sort of hand-tool. There were in fact several worktables available to the woodworkers in our shared space, but none suitable for serious work holding. After the recent FWW article on the low-budget Nicholson workbench, I became obsessed with the idea of building one. However, I wanted it to be available not just for myself, but for the other members and any students coming through the shop.

IMG_4131
Nicholson Bench in the foreground. My first bench (split top with face and tail vise) is hiding in the background under a mountain of toolboxes and debris.

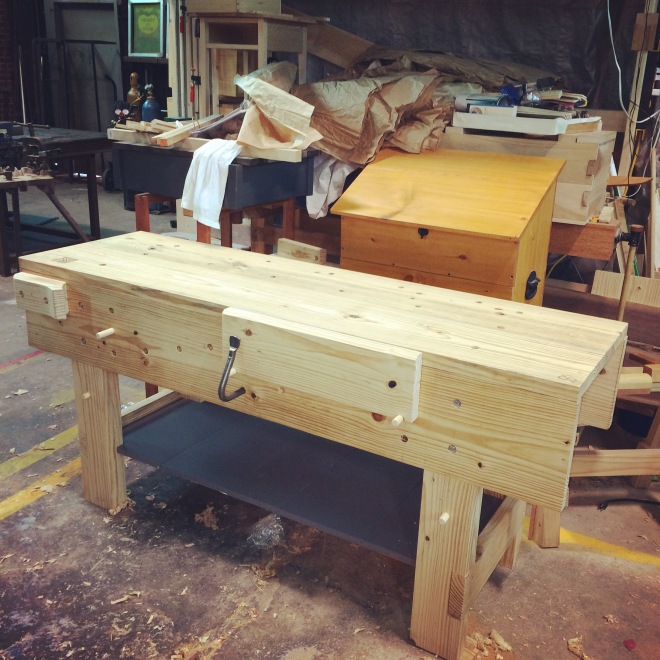
So I managed to build one of these benches, spending less than $200. And it has been a joy to use. I have also been happy to see others making use of it and enjoying woodworking more because of having access to it. This ended up leading to a desire on my part to put together a shaving horse as well, as we do have a growing contingent of spoon-carvers at our shop.

IMG_4236

The shaving horse design is 1/2 based on Peter Follansbee’s design, found here. The legs are different because my reamer hasn’t arrived yet, so I took a design cue from my saw-benches (Chris Schwarz’s design) for the back legs. The front leg pitches forward to allow the clamping apparatus to travel appropriately while in use. It also apparently makes it look like a motorcycle. I’ve heard people at the shop refer to it as a ‘chopper.’

Next I’ll be making some adjustments to my tool-chest, and I think I’ll begin prototyping some cabinet designs I’ve been dreaming about. Next month we are scheduled to move the shop to a new and better location.


Community Workbench & Shaving Horse

Mid-century side tables (completed)

These side tables were completed a few months ago. They were installed in our master bedroom, each under a hanging pendant in leu of a lamp. I hadn’t got around to photographing the final product until today.

Cabinet out of pine, painted caviar black by Sherwin Williams. Drawer front in curly red oak finished in natural shellac.


Mid-century side tables (completed)

Veneer hammer

I am planning some experiments with veneering and also with leatherwork for later this year. So I crafted a veneer hammer. I was inspired to make the hammer instead of purchasing one, after seeing some posts by Tom Fidgen on his website. This hammer took some cues from his, though departs from his design in several ways.


I couldn’t find a suitable piece of brass for the tip(s) of the hammer, so I made do with a piece of brass from a door hinge. Time will tell if this is going to work or not. If not, I may end up replacing the brass that I have.

The hammer was made from some scraps of maple that I had in the shop, and a little walnut wedge in the end of the tenon. Curves were cut on the bandsaw, though everything else was done by hand with a chisel, saws, and rasps. It was finished in danish oil & armor-seal.

I find again and again that I really hate metal-work. However, I imagine that it is similar to wood-working in that any misery and frustration in the work is due to (or at least directly proportional to) poor planning, lack of knowledge/skill, and inappropriate tooling.

I’m looking forward to posting some pics of the veneering experiments in the coming months.

Veneer hammer

Prototype dovetailed box

Working through ideas for potential projects meant for a small woodworking class, focusing on hand-tools.

This is one of the ideas I prototyped earlier this fall. I wanted a project that allowed students to practice hand-cutting dovetails, make an object that was actually attractive or useful, and could be completed in a single session.


It’s made of clear white pine obtained from the local home store. Nothing fancy, but sometimes beautiful things can come from ordinary beginnings.

We’ll have to mill the parts to final thickness and length, but I think even a beginner should be able to complete the box quickly.

We’ll see.

Prototype dovetailed box

Shop appliances…attempts to decrease entropy

Before moving on to the next “real” projects I needed to de-clutter my shop space. I rent a small area in a larger shop, so I have to pick up after myself at the end of the day and condense my gear back into a small footprint each day. Toward making that easier, I put together a storage unit to store some toolboxes, my larger clamps, and some jigs. It now rests at one end of my bench, with enough space around it to avoid collisions with the planes or saws when I’m using the face vise.

IMG_3607

I’ll post some pictures and instructions for the toolboxes in the next few days.

The storage unit was constructed over a few hours, using off-the-shelf softwood boards sized 3/4″ x 12″ x 6 feet. The shelves sit in dadoes that were cut by hand, then fixed with screws. The bins they form were sized to accommodate the jigs and tool-boxes, and the top (after giving it a subtle curved profile) was cut with grooves to accept the clamps.

I used a story stick to lay out the distances from the bottom of the panels to each shelf bottom, (done on each inside edge of both panels). The two marks were then connected with a marking knife, to form the bottom margin of each dado, before sawing.

The set-up to determine the location of the top margin of each dado, using the future shelf as a reference for the width of the dado.

Close-up view of how I positioned the fence.

The results were perfect.  Patience, careful set-up and a steady hand won the day. None of the 8 dadoes needed to be adjusted or finessed to fit the shelves tightly but smoothly.  After this the depth of the dadoes was achieved using a chisel and a router plane set to 1/4 inch depth.
The results were perfect. Patience, careful set-up and a steady hand won the day. None of the 8 dadoes needed to be adjusted or finessed to fit the shelves tightly but smoothly.
After this the depth of the dadoes was achieved using a chisel and a router plane set to 1/4 inch depth.
The feet were painted to help protect them from moisture; after they were painted I realized it would look a bit better if the top matched as well. 

The storage unit looks pretty good, fits my gear well, and keeps things out of the way. Setting up and breaking down my work-space is now much faster than it used to be.

Shop appliances…attempts to decrease entropy

Dutch Tool Chest part 3 (critique)

At this point the chest is finished. Here are some pics of the final result, with all the hardware in place and the finish on the chest.

The chest got 2 coats of danish oil. The next day I rubbed on some garnet shellac, followed by wax.

IMG_3515

IMG_3512 (1)

Now, on to the commentary…

The chest turned out better than I expected. I was unhappy with the quality of my work at several points along the way, in the construction of this piece; however, the end result ended up being quite beautiful once cleaned up and finished.

Having said that, it is worth sharing some mistakes and lessons I learned along the way:

The good

  1. Hand-cut dadoes (at least not stopped dadoes) are easy as long as you pay attention to what you are doing. This was my first time to make this particular joint and it went really well and the dado was tight and easy to fit (the floor of the top compartment is essentially a shelf whose front is obscured by the top half of the chest’s front).
  2. My hand-cut dovetails are getting better and better. (At least my through-dovetails).
  3. This chest is indeed easy to build, as Mr. Schwarz advertised. Two or 3 days in the shop for most people should be enough, exclusive of painting/finishing, etc…
  4. My first time to place hinges went much more smoothly than it should have. The pessimist in me fears it will never be so easy ever again…
  5. Very proud to say that no power tools were used in making this project.

The bad:

  1. If you look at the bottom edge of the side, you can see that I laid out my tails on the bottom board and the pins on the sides, which is the opposite of what I intended. Ultimately it will make no real difference (that joint carries only half the weight of the tools inside, and the dovetails were done well). The downside is that it looks like a funny finger joint. Oh well.
  2. I underestimated how wet the wood was. I should have stickered the boards and let them dry a little before starting. (In reality this would have been impossible. In all honesty, however, even if I had the option at the time, I would have barreled along into the project without properly accounting for the dampness of this wood. This was a mistake I would have made even if I was in full control of the situation when we started the project.) Pine doesn’t move a whole lot, compared to most woods I use, but I was astonished at how much movement I have seen in this piece so far. Most of the construction was done in February. Five months later my tongue and groove joints on the back are almost (but not quite) at their limits. Also some of the wood has threatened to split, in ways that weren’t apparent back in February.
  3. There are some fairly epic depths of tear-out in a few places. Partly due to the wood itself (lots of switching grain directions), but mainly due to my own impatience and lack of paying attention. In the end I opted to accept some of the tear-out; this was meant to be a working chest, not a show-piece, and I needed to finish things and move ahead to the next project. However, it was a good lesson for the future. Discipline is important.
  4. The chest looks nice, but in retrospect I would have used more blonde and less garnet shellac. This is a taste issue, but it does annoy me.

A fun and useful build. I recommend it to anyone, even if you don’t have need of a tool-chest. I had a lady come by the shop and ask if it was a toy-box. I suppose it is, in a way.

Tomorrow I move my man-toys into the chest, and begin a new project…

Dutch Tool Chest part 3 (critique)

Almost there…

The bases for the modern side tables went together very well. After this they were treated with kilz, re-sanded, then followed by a dark primer. Tomorrow I will be painting them their final color. (Sherwin-Williams Caviar, in enamel with matte finish)

painted bases
Bases for bedside tables. Splayed legs approx 9 degrees. 10 inches high, 18 inches wide, 13 inches deep. Final height of the tables will be just shy of 25 inches.

These tables ended up being executed using about 50/50 hand tools vs power tools, which was a major departure for me. I definitely am a new fan of the Festool domino joiner. It saved me about 8 – 14 hours in joining the bases alone. Will definitely be considering it from time to time in certain future projects as well.

For those looking forward to more hand-work stuff… tomorrow I will have some pics & info about my Dutch tool chest project, which I am also wrapping up this week. This was executed entirely by hand, from start to finish.

Almost there…

Introductions…

Rich here. Trying out a new format and location for sharing my woodworking projects.

I’ve been woodworking casually for about 8 years. For the greater part of that time, I was working 27 days a month and had little time to spend in the shop, but still made time. A year and a half ago, I took a new and better job that gives me every other week off, though somehow I still wasn’t making meaningful use of my shop.

Six months ago circumstances (a house remodel) led me to seek out a new shop space.

Recent pic of the new shop-space.

Since then I’ve been inspired to spend more time in the shop and my productivity has soared. Hence the interest in sharing my work more frequently…

I think the main difference has been the fact that the new space is a shared workspace, and being around other woodworkers and various artists has been incredibly inspiring for me. I’ve never been more productive or more happy in my woodworking. Now as the remodel comes to a close, I plan to keep renting the shared space.

My main focus is on hand-tool woodworking, though I do make limited use of machines, depending on the project.

Thanks for visiting!

Introductions…